Monday, April 9, 2012

Unbelievable Passover Brownies

Ok it's officially been way too long since I've posted.... so I'm sorry to the two people that actually read this blog (mom and one other haha).  And just for the record I have baked since my last post... once...   It was chocolate chip cookies and it was very uneventful (but they were so delicious!)  I am slightly embarrassed to admit that I used the recipe from the Nestle Tollhouse bag (.... but slightly proud.  Come on, we all know that recipe is amazing.)

Now that it's Passover and I have off from work for the week (hooray!), I knew I HAD to bake something.  Up until this year, I have always bought the "kosher for passover" box of brownie mix.  I have been making these brownies every year since I could help my mom mix the batter (I don't eat brownies regularly, but for some reason it's always a must for Passover).  They are always pretty good, but not GREAT.  This year, I was searching through a google document that my family made a few years ago (it has recipes, a basic grocery list, and other little things we need to remember to do for Passover).  There was an "Unbelievable Brownies" recipe posted from my sister.  And I made them.  And guess what.  You'd never even be able to tell that they are kosher for passover!  Thanks Rach!  No more "brownies from a box" for me!

 It's worth it for me to post the recipe for anyone who is interested because the brownies are pretty easy to make:

Unbelievable Brownies
Nonstick cooking spray
4 large eggs
2 cups sugar
1 cup vegetable oil
½ teaspoon fine sea salt
¾ cup Dutch process cocoa powder
1 cup potato starch
½ cup semi-sweet chocolate chips (optional)


Preheat oven to 350

Spray an 11 by 7 inch brownie pan with nonstick cooking spray.  Set aside

In the bowl of an electric mixer, beat the eggs and sugar until smooth.  Add the oil and salt.  Mix.  Sprinkle in the cocoa powder and mix to make the batter chocolatey.  Add the potato starch and mix to combine.  Scrape down the sides with a spatula.  Stir in the chocolate chips if using.

Pour into prepared pan.  Bake for 35-40 minutes.  Allow to cool before serving.


I just have one note to mention.  Usually when I bake, I bake for the minimum time it says on the recipe because my oven is pretty hot and my husband likes things soft.  On this recipe, I put the brownies back in the oven at least three times.  After I baked them a little longer than the recommended time, they came out perfect.  

Tuesday, February 21, 2012

Arielle

I wasn't able to bake this week because I was busy visiting my niece, Arielle... my niece who happens to be the cutest kid in the world.  So in honor of Arielle, I am posting a picture of the cookies I made for her 1st birthday party last summer:
These cookies were a huge hit at her party, and they were a big reason I decided to start this blog.  So thanks Arielle!

Also, here's a video from this weekend.   Arielle was learning to walk my dog, Topanga.

Monday, February 13, 2012

Happy Valentine's Day

     Happy Valentine's Day Blog World!  I went with lips and heart-shaped sugar cookies this time, as I had already had those cookie cutters in my house.   I had no problem creating a quick sugar cookie dough and getting these cookies baked and ready to decorate.
     In my ongoing effort to get a handle on the icing consistency, I whipped up a batch that was much thinner than my previous tries... by accident of course.  I looked at a review of the last icing recipe I used, and I saw that one woman recorded the ingredient amounts she preferred.. which were different than the original recipe.  That's what I decided to use this time.    Also, I added Strawberry Jam to the recipe, so it would naturally color the frosting as well as add some flavor.  The jam also accounted for the thinness of the icing.  I have to say, because of the jam, the taste of this batch of cookies are amazing, definitely my best tasting cookies so far.  And the thinner icing turned out to be a blessing in disguise, as it was much easier to coat the cookies with the frosting, and also, I was able to pick up a new decorating trick by experimenting.
     Here's the trick.  I used two shades of pink for my frosting.  After painting one shade as the base of the cookie, I used a tooth pick to create 3-4 lines going vertically down the cookie.  Then I took the same toothpick and swiped horizontal lines across the cookie.  The effect came out much better than I ever would have expected!  But the reason it definitely came out so great was because of how thin the icing was.
     After I allowed the base coat of the cookies to dry, I had to make more icing for the piping of the cookies.  This frosting was thicker than the last (more confectioner's sugar, less corn syrup), otherwise the decoration wouldn't have held.  I used heart sprinkles that I found in my cabinet from who knows when (probably last Valentine's Day?)  I guess I knew I'd be using them again some day!
     A little experimentation later, and I wound up with my favorite batch of cookies so far! Here they are:


Sunday, February 5, 2012

Superbowl

     Go Giants!  Ok I'll admit it, the Superbowl will be the first and only football game that I will have watched this season.  However, growing up in my house, I have always been a Giants fan by default.  Giants gear and memorabilia have always been displayed around my house, and as a result, I know little things about the team very well (colors, logo, some of the major players).  Enough of an excuse to dedicate a batch of cookies to the team?  I think so.
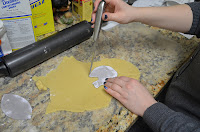
    I started with this idea when my husband and I decided to host a superbowl party.  My friends are not huge football fans, but they are HUGE food fans.  I knew they'd appreciate a grand cookie gesture from me.  I decided on footballs and helmets for this batch.  The problem was, I don't have a cookie cutter in either of these shapes.  I didn't want to go out and buy new ones, so I had to come up with something.  A trustee google search later, and I found the answer.  A way to "cut cookies in any customizable shape, without using a cookie cutter."  I took a piece of cardboard (about the thickness of a cereal box) and drew and cut out a football and a helmet.  I just made my sugar cookie dough as usual, rolled it out, and placed each cut-out on top of the dough.  Using a sharp kitchen knife, I carefully outlined the outside of the cardboard cut-out.  Voila, I had helmet and football cookie shapes.  Then I just transferred it to the tray as usual.  So easy, I can't believe I never thought of it before!  And by the way, I accidentally doubled the batch of sugar cookie dough, so I wound up with almost 50 cookies!
      I knew the next part of my job would be tough, but I was ready to tackle it.... so I thought.  First I made a chocolate icing for the footballs (made of egg whites, confectioner's sugar, and cocoa) and a blue icing (made of the same recipe I used in the previous post).  I spread them on the cookies and let it dry overnight.   I made a lot less icing than I had anticipated (probably because of all the extra cookies), so I had to run to the store to buy some more ingredients to make more.  (Just an aside, I had spoken with a friend this week who told me that I used too many ingredients in the sugar cookie icing... and that I should just use egg whites and confectioner's sugar).  So when I was at the store, I decided that instead of buying a lot of ingredients, I'd just pick up some confectioner's sugar and egg beaters and try it her way.  Problem was, I didn't know how much of each item to use.  I thought to myself that it was only 2 ingredients and that I would just mix them together....
     Looking back, this was probably my first mistake.  I mixed up the icing until I thought the consistency looked right.  I started decorating the tops of my cookies, and was having a ridiculous amount of trouble getting the icing out of the tube.  My hand was hurting, the icing was glopping, I was getting really frustrated.  Like, REALLY frustrated.  I thought I had the wrong kind of dispenser, the wrong kind of tips.... I must have ruined at least 10 cookies before realized that the icing needed to be thinner.   At this point, I miiiiight have made the false claim that this was my last time baking, and that I was quitting.... so I'm sorry to my husband for freaking out on him.  I'm not going to put an actual picture of what I looked like, but it was somewhat like this:


    Anyway, I took a break, and when I got back to work, I finally realized that I should thin out the icing.  I added more egg white beater and a little water to the icing, and I was finally able to decorate the cookies the way I wanted to.  The icing was a little thin at this point, but hey, at least it was coming out of the tube.  So, did all that freaking out pay off?  Well no, I shouldn't have gotten so upset about baking cookies.... but.... the cookies came out great, I think.  Thank goodness I had so many extra cookies to practice with.  I'm not going to post the bad ones... but here's how the majority came out.


Thursday, January 26, 2012

Snowflake Sugar Cookies

     This was a fun one.  I wanted to make cookies, but I didn't have an occasion, so I searched around my cookie [cutter] jar (a gift from my sister!), and I found a great snowflake-shaped cookie cutter than I have had yet to try!  I whipped up sugar cookie dough like a pro... found a great recipe online http://allrecipes.com/recipe/the-best-rolled-sugar-cookies/.  I rolled out the dough, and as soon as I started to use the cookie cutter, I realized right away that I would have a new challenge.


     The snowflake was so intricate that it would be hard to get the cut dough from the wax paper onto the tray!  After cutting 5 snowflakes, I carefully picked up the entire piece of wax paper and flipped it as fast as I could onto the tray.  Then I realized that there was no way I could maneuver it so that all the cookies would wind up sitting perfectly.  I decided to do 2 snowflakes at a time (having to re-roll pieces of the dough for each 2 cookies). This took a while, but it was worth it.  All of my snowflakes were intact!  I cooked each tray for 5 1/2 minutes (30 seconds less than the recommended 6-8 minutes).  


     The next day, it was time to tackle my biggest challenge yet... whipping up a sugar cookie frosting that would be easy to decorate with.  I found the following recipe online:
    \

  • 1 cup confectioners' sugar
  • 2 teaspoons milk
  • 2 teaspoons light corn syrup
  • 1/4 teaspoon almond extract
  • assorted food coloring

  •      This recipe got 4 1/2 out of 5 stars (with almost 2,000 reviews).  Seemed like a winner.  I bought the ingredients.. (An aside:  A lady at the supermarket stopped me to ask me what I was making with the Caro Light Corn Syrup.  She had apparently worked for the company and that was one of their "least popular" products.  How random).  Anyway, I bought the ingredients, blended them together by hand, and wound up with yet another clumpy mess.  I must have made it wrong, I thought.  I made 2 more servings- this time blending in my mixer.  Same problem.  I reread some of the reviews, looking for some guidance.  Most said the frosting was "perfect as is," but someone did say they had to play around with the amounts to get the right consistency.  And another person said they doubled the milk and corn syrup.  So I thought to myself, I can fix this!  I combined the servings to make 3, and I added dashes of milk and corn syrup until the consistency looked right.  At this point, it actually looked great!  I split the frosting into 2 bowls to make dark blue and a light blue frosting.  The consistency of this frosting actually came out perfect for decorating my snowflakes.  I wish I can remember exactly how much I put of everything!  That's a task for next time I suppose.

  •     As for the taste, the sugar cookie itself it quite delicious, and I'm not sure I want to change a thing.  For the frosting, the jury is still out on using almond extract.  I think next time I make that frosting, I will use vanilla extract and try to compare.  I need some more taste testers before I can make a final decision.        
  •     
  •     As for the decoration, I will let the picture speak for itself!

  •     

Sunday, January 8, 2012

Eleni's New York

I took a walk with my hubby and pup (Justin and Topanga) this weekend, and I came across an unexpected surprise.  We passed an adorable bakery called Eleni's New York.  I went inside (bought a coffee so I didn't like a weird stalker girl staring at everything), and fell in love.  The style, the pink and white colors, the hundreds of sugar cookies in the window... exactly the kind of bakery I would love to have.  

     Although they sell cookies, cupcakes, and coffees, the primary focus of the bakery is sugar cookies, decorated in a hundred different ways.  They had pre-made boxes with themes... (10 cookies that had to do with ballet, 20 cookies for a birthday etc.) packaged perfectly with a clear top and a ribbon.
Here is a picture I took of the store's main counter.
     After leaving the bakery and chatting with Justin, I came to a revelation, and a new direction for this blog.  For now, I'm going to focus on sugar cookies, and sugar cookies alone.  I'm going to perfect the recipe for taste (cookie and icing too), and perfect the style and technique for the decorating.  Once they are perfect, I'll start with variations.  From now on, even though I haven't yet tasted their cookies, Eleni's New York will be my inspiration.


Peanut Butter Follow Up

Here's the finished product of the peanut butter cookies.  Still a bit dry, but the chocolate frosting definitely helped the taste!  One of my friends even called them "addicting" :)