Go Giants! Ok I'll admit it, the Superbowl will be the first and only football game that I will have watched this season. However, growing up in my house, I have always been a Giants fan by default. Giants gear and memorabilia have always been displayed around my house, and as a result, I know little things about the team very well (colors, logo, some of the major players). Enough of an excuse to dedicate a batch of cookies to the team? I think so.
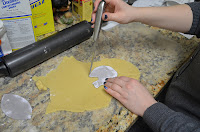
I started with this idea when my husband and I decided to host a superbowl party. My friends are not huge football fans, but they are HUGE food fans. I knew they'd appreciate a grand cookie gesture from me. I decided on footballs and helmets for this batch. The problem was, I don't have a cookie cutter in either of these shapes. I didn't want to go out and buy new ones, so I had to come up with something. A trustee google search later, and I found the answer. A way to "cut cookies in any customizable shape, without using a cookie cutter." I took a piece of cardboard (about the thickness of a cereal box) and drew and cut out a football and a helmet. I just made my sugar cookie dough as usual, rolled it out, and placed each cut-out on top of the dough. Using a sharp kitchen knife, I carefully outlined the outside of the cardboard cut-out. Voila, I had helmet and football cookie shapes. Then I just transferred it to the tray as usual. So easy, I can't believe I never thought of it before! And by the way, I accidentally doubled the batch of sugar cookie dough, so I wound up with almost 50 cookies!
I knew the next part of my job would be tough, but I was ready to tackle it.... so I thought. First I made a chocolate icing for the footballs (made of egg whites, confectioner's sugar, and cocoa) and a blue icing (made of the same recipe I used in the previous post). I spread them on the cookies and let it dry overnight. I made a lot less icing than I had anticipated (probably because of all the extra cookies), so I had to run to the store to buy some more ingredients to make more. (Just an aside, I had spoken with a friend this week who told me that I used too many ingredients in the sugar cookie icing... and that I should just use egg whites and confectioner's sugar). So when I was at the store, I decided that instead of buying a lot of ingredients, I'd just pick up some confectioner's sugar and egg beaters and try it her way. Problem was, I didn't know how much of each item to use. I thought to myself that it was only 2 ingredients and that I would just mix them together....
Looking back, this was probably my first mistake. I mixed up the icing until I thought the consistency looked right. I started decorating the tops of my cookies, and was having a ridiculous amount of trouble getting the icing out of the tube. My hand was hurting, the icing was glopping, I was getting really frustrated. Like, REALLY frustrated. I thought I had the wrong kind of dispenser, the wrong kind of tips.... I must have ruined at least 10 cookies before realized that the icing needed to be thinner. At this point, I miiiiight have made the false claim that this was my last time baking, and that I was quitting.... so I'm sorry to my husband for freaking out on him. I'm not going to put an actual picture of what I looked like, but it was somewhat like this:

Anyway, I took a break, and when I got back to work, I finally realized that I should thin out the icing. I added more egg white beater and a little water to the icing, and I was finally able to decorate the cookies the way I wanted to. The icing was a little thin at this point, but hey, at least it was coming out of the tube. So, did all that freaking out pay off? Well no, I shouldn't have gotten so upset about baking cookies.... but.... the cookies came out great, I think. Thank goodness I had so many extra cookies to practice with. I'm not going to post the bad ones... but here's how the majority came out.
.JPG)
.JPG)
.JPG)

.JPG)
.JPG)
.JPG)
.JPG)


.JPG)
.JPG)


.JPG)


.JPG)

.JPG)
.JPG)
.JPG)


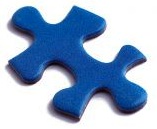 Happy Birthday Mom! I wanted to make a cookie creation as a gift for my mom for her birthday, so she was the inspiration for this project. Growing up, one of my favorite things to do with my mom was to put together puzzles while we watched our favorite tv shows and chatted. Now that we don't live in the same house, we have puzzle swaps so that we can still enjoy the hobby. A perfect personalized gift for my mom would be a sugar cookie puzzle cake. It's quite an ambitious task, but to be cookie queen, I have to try everything right?

 When I finished, I put the puzzle back in the oven to cook for the remaining 2 minutes. At this point I found that the dough still looked too soft, so I left it in the oven for an extra 2 minutes. Must have been because the dough was baking altogether, instead of in separate cookie cutter shapes. Once the puzzle was out of the oven for good, I ran through the puzzle with my knife again, using the same tapping strategy, and I carefully separated the puzzle pieces. This was a tough task. Some of the edges looked jagged, so I used the knife to try to smooth out the edges as best I could. I put the separated puzzle pieces in the freezer to cool for about an hour.
 It was time for the icing. I used egg whites, lemon juice, and confectioner's sugar. I halved the icing into 2 bowls, putting purple food coloring in one and sugarless strawberry jam in the other. I kept adding more and more jam into the one half until the color was just right. It was super thin at this point. Perfect, I thought, to paint on the base color with a basting brush. The icing glided right on, smooth and thin, and I thought it would be perfect.
  The good news was that even though the icing never dried completely, it did dry enough to the point where it was just sticky. I could still easily decorate over it. I put the pieces back together (cutting the edges of some of the pieces so that it fit) and got to work with the purple icing. I used two tips to write happy birthday over the puzzle pieces, and create a flower border. Since the pieces were still slightly spaced apart, I easily used a knife around the puzzle pieces to separate the wet purple icing that connected each piece.


 Here's the trick. I used two shades of pink for my frosting. After painting one shade as the base of the cookie, I used a tooth pick to create 3-4 lines going vertically down the cookie. Then I took the same toothpick and swiped horizontal lines across the cookie. The effect came out much better than I ever would have expected! But the reason it definitely came out so great was because of how thin the icing was.


 I started with this idea when my husband and I decided to host a superbowl party. My friends are not huge football fans, but they are HUGE food fans. I knew they'd appreciate a grand cookie gesture from me. I decided on footballs and helmets for this batch. The problem was, I don't have a cookie cutter in either of these shapes. I didn't want to go out and buy new ones, so I had to come up with something. A trustee google search later, and I found the answer. A way to "cut cookies in any customizable shape, without using a cookie cutter." I took a piece of cardboard (about the thickness of a cereal box) and drew and cut out a football and a helmet. I just made my sugar cookie dough as usual, rolled it out, and placed each cut-out on top of the dough. Using a sharp kitchen knife, I carefully outlined the outside of the cardboard cut-out. Voila, I had helmet and football cookie shapes. Then I just transferred it to the tray as usual. So easy, I can't believe I never thought of it before! And by the way, I accidentally doubled the batch of sugar cookie dough, so I wound up with almost 50 cookies!


